

So, you're thinking about getting your first tattoo. That's a huge step, and the mix of excitement and nerves you're probably feeling is completely normal. Good preparation is what transforms those jitters into pure confidence, ensuring your first time is a fantastic experience from start to finish.
This isn't just about showing up for an appointment. It's about a partnership between you and your artist to create something permanent and meaningful. This guide is your roadmap, breaking down every step from that first spark of an idea to walking out of the studio with your new ink.
We'll walk through the whole process in clear, manageable stages. Let's get you ready.
A Cultural Shift in Body Art
You're not alone in this. Tattoos have gone fully mainstream, with studies showing that nearly half of all American adults—46%, to be exact—have at least one. This isn't a niche subculture anymore; it's a massive, growing community.
This explosion in popularity has been great for the industry. The old-school, intimidating tattoo parlors are being replaced by professional, welcoming studios that put a massive emphasis on safety, artistry, and making sure clients feel comfortable and informed. They want you to feel good about the process.
Your preparation is a sign of respect—for yourself, for your artist, and for the art itself. When a client comes in prepared, it lets the artist focus 100% on their craft. The result is always a better tattoo and a smoother experience for everyone involved.
To make this as straightforward as possible, here's a quick look at the key stages we'll be covering.
First Tattoo Preparation Checklist At a Glance
This table breaks down the entire journey into simple, actionable phases. Think of it as your high-level game plan.
| Preparation Stage | Key Action Items | Timeline |
|---|---|---|
| Phase 1: Research & Discovery | Nail down your design concept, find artists whose style you love. | 6-12 Months Out |
| Phase 2: Booking & Consultation | Reach out to your chosen artist, book a consultation, pay the deposit. | 3-6 Months Out |
| Phase 3: Physical & Mental Prep | Start a good skincare routine, stay hydrated, arrange time off work. | 1-2 Months Out |
| Phase 4: The Final Countdown | Get plenty of sleep, avoid alcohol/blood thinners, eat a solid meal. | The Week Of |
| Phase 5: Tattoo Day & Aftercare | Wear comfy clothes, bring snacks/water, listen to aftercare instructions. | Day Of & Beyond |
Each of these stages is crucial for a smooth process, and we'll dive deep into every single one.
What This Guide Covers
We’re going to walk through every critical part of the process, leaving no stone unturned. By the time you're done reading, you'll know exactly what to do.
You'll learn about:
- Refining Your Idea: How to move from a vague concept to a solid design you’ll be happy with for life. For a deeper dive on this, check out our guide on how to choose your first tattoo.
- Finding the Right Artist: This is easily the most important decision you'll make in this entire journey.
- Getting Ready, Body and Mind: We'll cover everything from skin prep to getting your head in the right space.
- The Day Of: What to wear, what to pack, and how to handle yourself in the studio.
- Immediate Aftercare: The first 24-48 hours are critical for making sure your new tattoo heals perfectly.
By the end, any nervousness you have will be replaced with pure, focused excitement for your appointment. Let's get started.
Finding Your Vision and Your Artist
This is where it all begins—the moment an abstract idea starts to become a real, permanent piece of art on your skin. The very first step, before you even think about needles or aftercare, is to move from a hazy concept to a concrete vision you’ll still love a decade from now. It’s tempting to jump on the latest trend, but your tattoo should feel like you.
Start by gathering inspiration, but do it with a clear purpose. Sure, Pinterest and Instagram are great places to start, but don’t just mindlessly save pictures of tattoos you think are cool. Use them to figure out the artistic style that genuinely connects with you. Are you pulled towards the bold, classic lines of American Traditional? Or maybe the delicate, subtle nature of fine-line work? Perhaps it’s the epic storytelling in Japanese style or the smooth, lifelike shading of black and grey realism that catches your eye.
From Inspiration to a Unique Concept
Once you’ve got a collection of images, it’s time to play detective. Look for the common threads. What subjects keep showing up? What kind of line weight or shading technique are you consistently drawn to? Remember, this folder isn't a catalog to pick a design from; it's a visual language you'll use to communicate your ideas to your artist.
Think about the story you want to tell. A good tattoo has meaning, even if that meaning is purely about aesthetics. Ask yourself a few key questions to sharpen your idea:
- What’s the core theme? Is it a tribute to someone, a personal symbol, or just a piece of art you can't stop thinking about?
- Where do you see it living? Placement is a huge part of the design. The spot you choose will dictate the flow, size, and shape of the final piece.
- What’s the mood? Do you want something bold and powerful, or is the goal more subtle and elegant?
This early research is about finding a direction, not a final drawing. Your artist will take this foundation and build a custom piece that’s entirely yours.
Vetting Artists and Their Portfolios
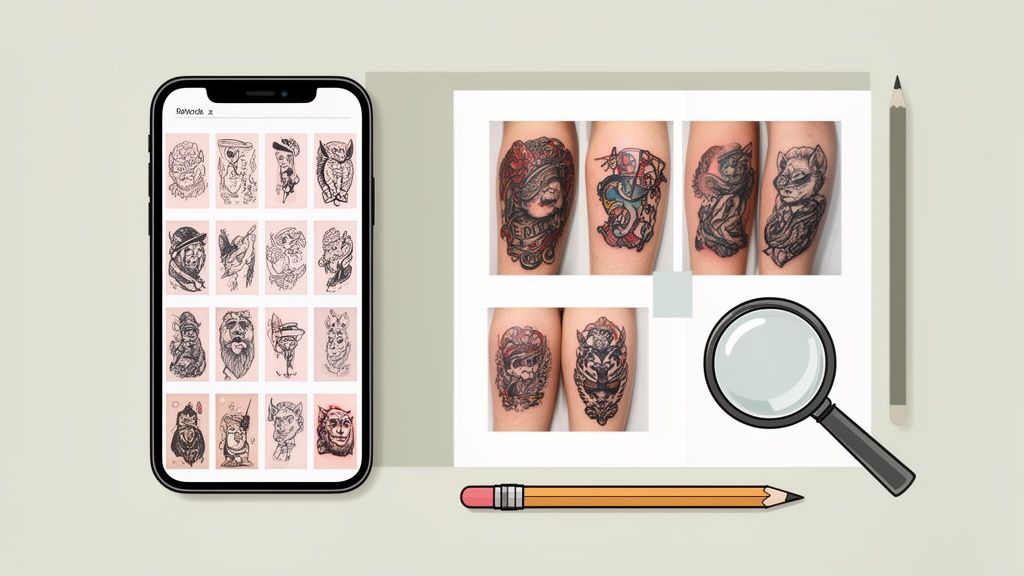
With a clearer vision in hand, you’re ready for the single most important task: finding the right artist. A brilliant concept can be ruined by the wrong hands, just as a master artist can turn a simple idea into a masterpiece. An artist's portfolio is their resume—you need to know how to read it properly.
Don't just look for pretty pictures. Scrutinize the technical quality. Are the lines crisp, solid, and consistent? Is the color packed in evenly, with no patchy areas? For black and grey work, are the gradients buttery smooth? These are the details that separate the pros from the amateurs.
Most importantly, hunt for healed photos. A fresh tattoo almost always looks great, but the real test is how it settles into the skin. Reputable artists are proud of their healed work and will show it off. Healed shots reveal the artist’s true skill and prove their work is built to last.
A tattoo artist who specializes in a style isn’t just better at it—they are passionate about it. That passion translates into a deeper understanding of the rules, flow, and history of the art form, resulting in a more authentic and powerful tattoo.
Matching the Artist to Your Vision
Finding a technically sound artist is only half the job. The final piece of the puzzle is making sure their specialty aligns with your desired style. If you want a delicate, single-needle wildflower, you don't go to an artist whose entire portfolio is filled with bold, traditional eagles.
Artists specialize for a reason. It’s what they love and what they’ve dedicated years to perfecting. Asking them to work far outside their lane often leads to a tattoo that just feels… off. Respect their craft by choosing them for the work they’re known for. This is a critical step that many first-timers unfortunately miss. For a deeper dive, you can learn more about how to choose a tattoo artist in our dedicated guide.
Preparing for the Consultation
Once you have a shortlist of artists, it's time to book a consultation. This isn't just a formality; it's your chance to collaborate, ask questions, and make sure you vibe with the person who will be creating permanent art on your body. To get the most out of it, show up prepared.
Bring your inspiration folder, but be ready to let go of any rigid preconceptions. Trust the artist. They’re the expert on what works on skin, how a design will flow with your anatomy, and how it will age over the next 20 years. This is a collaboration, so be open to their professional input.
It’s also smart to come with a list of questions, such as:
- How would you interpret my idea in your specific style?
- Can you walk me through your booking process and deposit policy?
- Based on my idea, do you have any suggestions for placement or size?
A good consultation should feel like an exciting creative brainstorm. It’s the meeting point where your vision and their skill start to become a beautiful, final design.
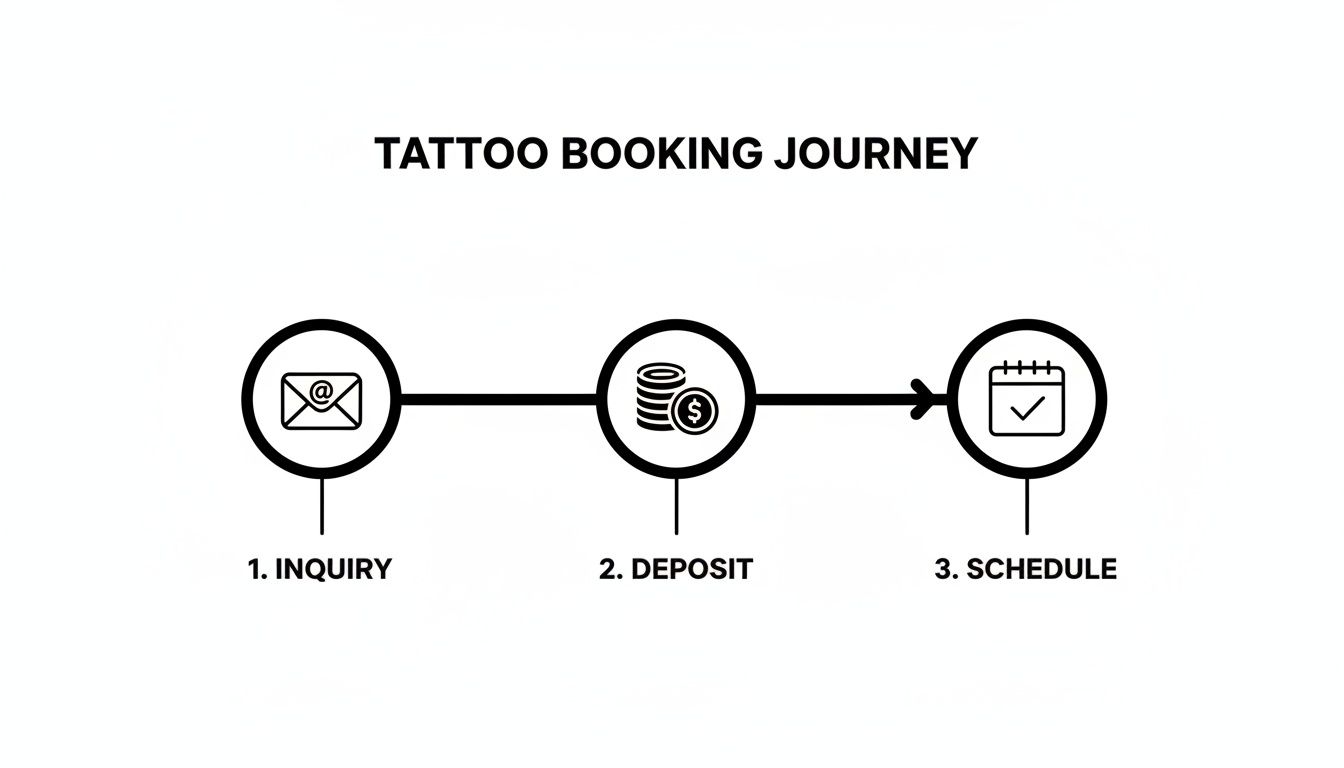
How to Book Your Appointment and Nail the Studio Etiquette
Alright, you’ve done the hard part. You’ve scrolled through countless Instagram feeds, found an artist whose work speaks to you, and you're ready to make it happen. Now comes the part where you go from being a fan to a client. This is all about clear communication, understanding how the shop works, and showing respect for the artist's time and talent.
Most artists these days have a specific way they handle bookings, which you can usually find right in their social media bio or on the studio's website. It’s almost always an email or a dedicated booking form. Whatever you do, don't send a vague "how much for a tattoo?" message. You're starting a professional relationship, so treat it that way and give them everything they need right from the start.
To get the ball rolling smoothly, your first message should be clear and concise. Make sure you include:
- Your Idea: A quick, clear description of what you want. Mention the subject matter and any symbolism that's important to you.
- Reference Photos: Attach those inspiration pics you've been saving. Just be sure to mention you're looking for their unique take on it, not a direct copy.
- Placement & Size: Where on your body do you want the tattoo? Give them an approximate size in inches.
- Your Availability: Let them know what days or times generally work for you. This cuts down on a lot of back-and-forth emails.
The Deposit: Securing Your Spot
Once you and the artist have hashed out the details and you're both on the same page, they'll ask for a deposit. This is a non-negotiable, standard part of the process, so don't be surprised. It's not some extra fee—it’s your down payment. It locks in your appointment and, just as importantly, pays the artist for the time they’re about to spend drawing your custom piece.
Think of it as a handshake agreement. It tells the artist you're serious, and it guarantees that a slot in their calendar belongs to you and only you. Because of this, deposits are almost always non-refundable. If you bail last minute or just don't show up, the artist has lost a full day of income and has already put hours of work into your design.
The deposit protects the artist's time and creative energy. It's a sign of mutual respect that formalizes the agreement and allows the artist to begin the custom design process with confidence.
Tattoo Studio Etiquette 101
Walking into a tattoo studio for the first time can feel a little intimidating, but knowing some basic etiquette will make the whole experience way more comfortable. These aren't super strict rules, just common sense courtesies that make for a good vibe for you, your artist, and everyone else in the shop.
First and foremost, trust your artist. You picked them for a reason, right? You love their style and their expertise. So, be open to their professional opinion. They know how a design will flow on the body, which details will look good ten years from now, and how to best bring your idea to life on skin. It's a collaboration, but let them steer the ship.
Another big one is tipping. In the tattoo world, a tip is the most direct way to show you appreciate the artist's skill, the service you received, and the hours of work that went into your piece. While it's not technically mandatory, it's absolutely standard practice.
- The Tipping Standard: A good rule of thumb is 15-20% of the tattoo's total cost, much like you'd tip in any other service industry.
- Why It's a Big Deal: It's a nod to their expertise, the custom artwork they created just for you, and the physical effort it takes to tattoo for hours on end.
- How to Do It: You can give them cash directly or ask the front desk if you can add it to your card payment.
Following these simple guidelines doesn't just show respect; it helps build a great relationship with your artist for any future ink you might want. For an even deeper dive into the scheduling process, check out our dedicated guide on how to book a tattoo appointment.
Preparing Your Body and Mind for Tattoo Day
What you do in the days leading up to your appointment is just as crucial as the tattoo session itself. Getting this part right can dramatically impact your pain tolerance, how well your skin takes the ink, and even how smoothly the whole thing heals.
Think of your skin as the canvas. The better its condition, the better the final piece of art will be. This isn't about some complicated regimen; it's about a few simple, consistent habits that create the ideal surface for your artist to work on and make the whole experience better for you.
Long-Term Skin and Body Care
Great tattoo prep starts weeks before you ever set foot in the studio. Healthy, hydrated skin is simply more resilient. It accepts ink more evenly, which leads to a smoother application process and a more vibrant, solid tattoo once it's healed.
About two weeks out, start a daily moisturizing routine on the area you plan to get tattooed. You don't need anything fancy or expensive; a quality, unscented lotion will do the job perfectly. This small step plumps up the skin cells and makes the surface more supple.
At the same time, you have to protect that skin from the sun. We absolutely cannot tattoo sunburned skin—it's damaged, incredibly painful to work on, and will heal poorly, likely ruining the tattoo. If you're going to be outside, use a good SPF. No excuses.
Beyond topical care, focus on hydrating from the inside out by drinking plenty of water every day. This improves your skin's elasticity and overall health, which makes a real difference. For some broader insights, you can find helpful perspectives in guides about general preparation for body treatments.
Healthy skin is easier to tattoo, which often means a quicker session for the artist and less time under the needle for you. A little prep work is a win-win for everyone involved.
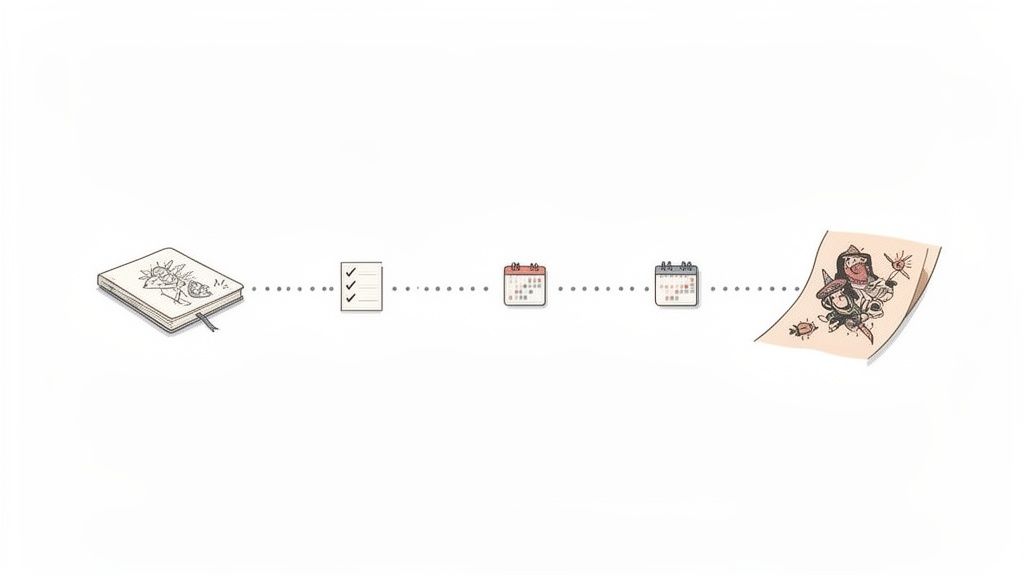
The visual below shows the simplified journey from first contact to getting your date on the calendar.
This process streamlines communication, ensuring your artist has all the necessary information before securing your appointment with a deposit.
The Critical 48 Hours Before Your Appointment
The two days before you get tattooed are when your preparation really kicks into high gear. Your main goals are simple: be well-rested, well-fed, and sober. These factors directly influence your body's ability to handle the stress of getting tattooed.
- Avoid Alcohol Completely: This is a big one. Alcohol thins your blood, which can cause you to bleed more during the session. Extra bleeding makes the artist's job much harder and can dilute the ink, potentially messing with how your tattoo heals and looks. Skip the drinks for at least 24-48 hours beforehand.
- Get a Full Night's Sleep: Showing up to your appointment exhausted is a recipe for a bad time. A well-rested body has a much higher pain tolerance and is better equipped to sit still for hours. Aim for a solid eight hours the night before.
- Eat a Substantial Meal: Never, ever get tattooed on an empty stomach. Eat a balanced meal full of protein and complex carbs about an hour before you head to the shop. This keeps your blood sugar stable and dramatically reduces the risk of feeling dizzy, lightheaded, or even fainting.
Also, be smart about medications. Common over-the-counter drugs like aspirin or ibuprofen can have blood-thinning effects, similar to alcohol. If you're on any prescription medication—especially blood thinners, Accutane, or antibiotics—you need to have a conversation with both your doctor and your artist well in advance of your appointment.
Managing Nerves and Setting Expectations
It’s completely normal to feel nervous before your first tattoo. A huge part of preparing is just getting your head in the right space. A calm mind leads to a relaxed body, which makes the entire process so much smoother for everyone.
First, set realistic expectations about the pain. Yes, it will hurt, but the sensation is often more of a persistent scratching or stinging feeling than an unbearable, sharp pain. The intensity varies a ton depending on the placement. Try not to psych yourself out by watching dramatic videos online—it rarely helps.
On the day of the appointment, practice some simple calming techniques. Deep, steady breathing can work wonders for managing both discomfort and anxiety. And remember, you are in control. If you need a short break to stretch, grab some water, or just reset, all you have to do is ask. Your artist wants you to be as comfortable as possible.
What to Expect on Tattoo Day
The day is finally here. You’ve done the research, chosen your artist, and prepped your skin. Now it’s time to walk into the studio and bring your vision to life. Knowing the play-by-play of the session will help settle any last-minute jitters and let you fully embrace the experience.
It all starts before you even leave the house. First, eat a real meal about an hour before your appointment. This is non-negotiable. A solid breakfast or lunch packed with protein and complex carbs keeps your blood sugar stable, which is the single best thing you can do to avoid feeling dizzy or lightheaded.
Next, plan your outfit. The two most important factors are comfort and accessibility. Wear loose, comfortable clothes that give your artist easy access to the area getting tattooed. Think practically: a button-down shirt worn backward is perfect for a back piece, and loose shorts are a no-brainer for a thigh tattoo.
Your Tattoo Day Go-Bag
You don’t need to pack for a weekend trip, but having a few key items on hand can be a total game-changer, especially for a session lasting more than an hour or two.
- Valid Photo ID: No ID, no tattoo. This is a legal requirement to verify your age, and there are no exceptions.
- Snacks and Drinks: A sugary drink like juice or soda can give you a quick boost if you feel your energy dip. Granola bars, candy, or fruit are also great to have on hand.
- Headphones or a Book: A good distraction is your best friend. A compelling podcast, a great playlist, or a book can help you zone out and manage discomfort.
- Phone Charger: Your phone will likely be your main source of entertainment, so make sure it doesn't die mid-session.
Properly preparing for your first tattoo is also the best way to avoid joining the 6% to 10% of people who report tattoo regret. Research shows a huge number of those who regret their ink made impulsive decisions without doing their homework. A licensed artist follows strict hygiene protocols, which is vital because complications like infections or allergic reactions can occur.
The In-Studio Experience
When you arrive, the first thing you'll do is fill out some paperwork, including a consent form. After that, your artist will show you the final design for your approval. This is your last chance to request any minor tweaks. Once you give the final okay, they’ll create a stencil.
The artist will then clean and shave the area. Don’t worry about shaving it yourself beforehand; artists much prefer to do it themselves to avoid dealing with any nicks or razor burn you might have caused. Next, they'll apply the stencil to your skin, letting you check the placement in a mirror from every angle until you're 100% happy with it.
The moments before the machine starts are all about collaboration and confirmation. We check placement from every angle to ensure it flows with your body. A clean station, fresh needles, and your final approval are the last steps before we begin.
You’ll see your artist set up their station with single-use needles, disposable tubes, and fresh ink caps. Every surface will be wrapped in plastic barriers for hygiene. This transparent, clean setup is the hallmark of a professional studio.
Managing Pain and Staying Comfortable
Once the machine starts, you’ll hear its signature buzz. The initial sensation is often described as a sharp, hot scratching feeling. The first five minutes are usually the most intense as your body gets used to the feeling.
Your breathing is your most powerful tool. Focus on deep, slow, steady breaths—it makes a massive difference in how you perceive the pain. Whatever you do, don't hold your breath or tense up your muscles. That will only make it worse. Try to let your body relax into the chair.
Communication is key. Your artist expects and wants you to speak up if you need a break. Whether it's to stretch, use the restroom, or just take a five-minute breather, just say the word. They would much rather you be comfortable than have you suffer in silence. For post-tattoo care, understanding the difference between heat therapy vs cold therapy can also be a huge help in managing any swelling and discomfort during the first few days of healing.
Got Questions? We've Got Answers.
Even with all the prep work, it’s completely normal to have a few last-minute questions buzzing around in your head. Getting your first tattoo is a big deal, and wanting to have every detail locked down is a good sign you're taking this seriously.
Let’s run through some of the most common questions we hear from first-timers. We'll give you straight, no-nonsense answers to help clear things up and calm those nerves.
How Much Is This Going to Hurt?
This is the big one, isn't it? The honest answer is that it's different for everyone. Your personal pain tolerance, the artist's specific technique, and—most importantly—where you get the tattoo all play a huge role.
Some spots are just more sensitive than others, usually where the skin is thin and right on top of bone. Think ribs, ankles, the top of your feet, or your sternum. On the flip side, areas with a bit more cushion from muscle or fat, like the outer thigh, bicep, or calf, tend to be much more manageable for a first session.
Most people describe the feeling as a constant, hot scratching sensation or a strong vibration, not a sharp, unbearable pain. The first few minutes are usually the most intense part as your body figures out what's happening. After that, your adrenaline typically kicks in and helps take the edge off.
Remember, the pain is temporary, but the art is forever. Just focus on your breathing. And never, ever hesitate to ask your artist for a quick break if you need to reset. They're used to it and would much rather you be comfortable.
What's the Basic Aftercare Routine?
Your artist is going to give you a specific set of aftercare instructions designed for you and your new tattoo. Listen to them above all else. That said, the core principles for healing a tattoo are pretty universal. Getting this part right is non-negotiable for making sure your ink looks incredible for years to come.
The daily routine is simple but crucial:
- Wash It Gently: After you take off the initial bandage (your artist will tell you when), you'll need to wash the tattoo 2-3 times a day. Just use lukewarm water and a gentle, fragrance-free antimicrobial soap.
- Pat, Don't Rub: Use a clean paper towel to gently pat the area dry. Rubbing can irritate the hell out of your healing skin and potentially pull out ink.
- Moisturize Lightly: Apply a super-thin layer of the aftercare product your artist recommended. Seriously, less is more here. Piling on ointment can clog your pores and mess up the healing process.
For the first couple of weeks, you also need to keep your tattoo from getting soaked. That means no swimming pools, no hot tubs, and no long, steamy baths. You also have to keep it completely out of the sun. UV rays are the enemy of a new tattoo and can cause major fading and damage.
Can You Tattoo Over Scars or Moles?
This comes up a lot when people are figuring out placement. Tattooing over scars is definitely possible, but there are a few conditions. First, the scar has to be completely healed—we're talking at least a year or two old—and shouldn't be raised or keloided. A talented artist can do amazing things to incorporate or cover a healed scar, but it always requires an in-person consultation to see what’s possible.
When it comes to moles, however, the answer is always a hard no. Any reputable, professional artist will refuse to tattoo directly over a mole. It’s a critical safety measure. Covering a mole makes it impossible for you or a doctor to see if it changes size, shape, or color, which are potential warning signs for skin cancer. A great artist will work the design around the mole, making it a seamless part of the piece without ever touching it.
How Long Until It's Fully Healed?
Tattoo healing comes in stages. The initial phase you'll notice—where the skin is peeling and maybe a little flaky—usually takes about two to four weeks. Your tattoo might look a little dull or have a "milky" look to it during this time. Don't panic; that's totally normal.
Even though it looks healed on the surface after a month, the deeper layers of skin are still doing their thing and regenerating. That full, deep healing process can take anywhere from three to six months. You'll know it's 100% healed when the texture of the tattooed skin feels exactly like the skin around it and any "shininess" is completely gone. Stick with your aftercare, and you’ll give it the best possible chance to heal perfectly.
At Fountainhead New York, we live for this stuff. We pride ourselves on creating an environment where first-timers feel just as comfortable and respected as seasoned collectors. When you’re ready to take the leap, our team is here to guide you with skill, artistry, and professionalism.
Explore our artists' portfolios and book your consultation today at fountainheadny.com


